
No Save & Quit
Route intended for NTSC-U 1.0.
The route specified does bomb duping. It's likely optimal to skip bombs, but requires a wolfos jump over the wall in the courtyard in Snowpeak Ruins.
Ordon
- Ordon Gate Clip
- Call Epona, dash to Coro
- Lantern while on Epona
- [Lantern (B)]
- Save Talo
- Bokoblins Break Cage
- Bokoblin Pushing
- Goats
- Castle sewers (1R+)
- Castle rooftops
- Sword & Shield Skip (5R+)
Faron Province
- S. Faron warp portal
- Faron Vessel
- Kill first two bugs (leave tears)
- Bug outside Coro's house
- Bugs inside Coro's house
- Dig under gate, kill bugs, enter loading zone after bugs explode (leave tears)
- Tunnel
- Bugs on left wall (leave tears)
- Bugs in tree trunk
- Ignore bugs that dig
- EMS
- Enter Sacred Grove
- Skull Kid chase 1
- Skull Kid fight 1 (8R+)
» Master Sword puzzle (RD UUU LL DDD RU)
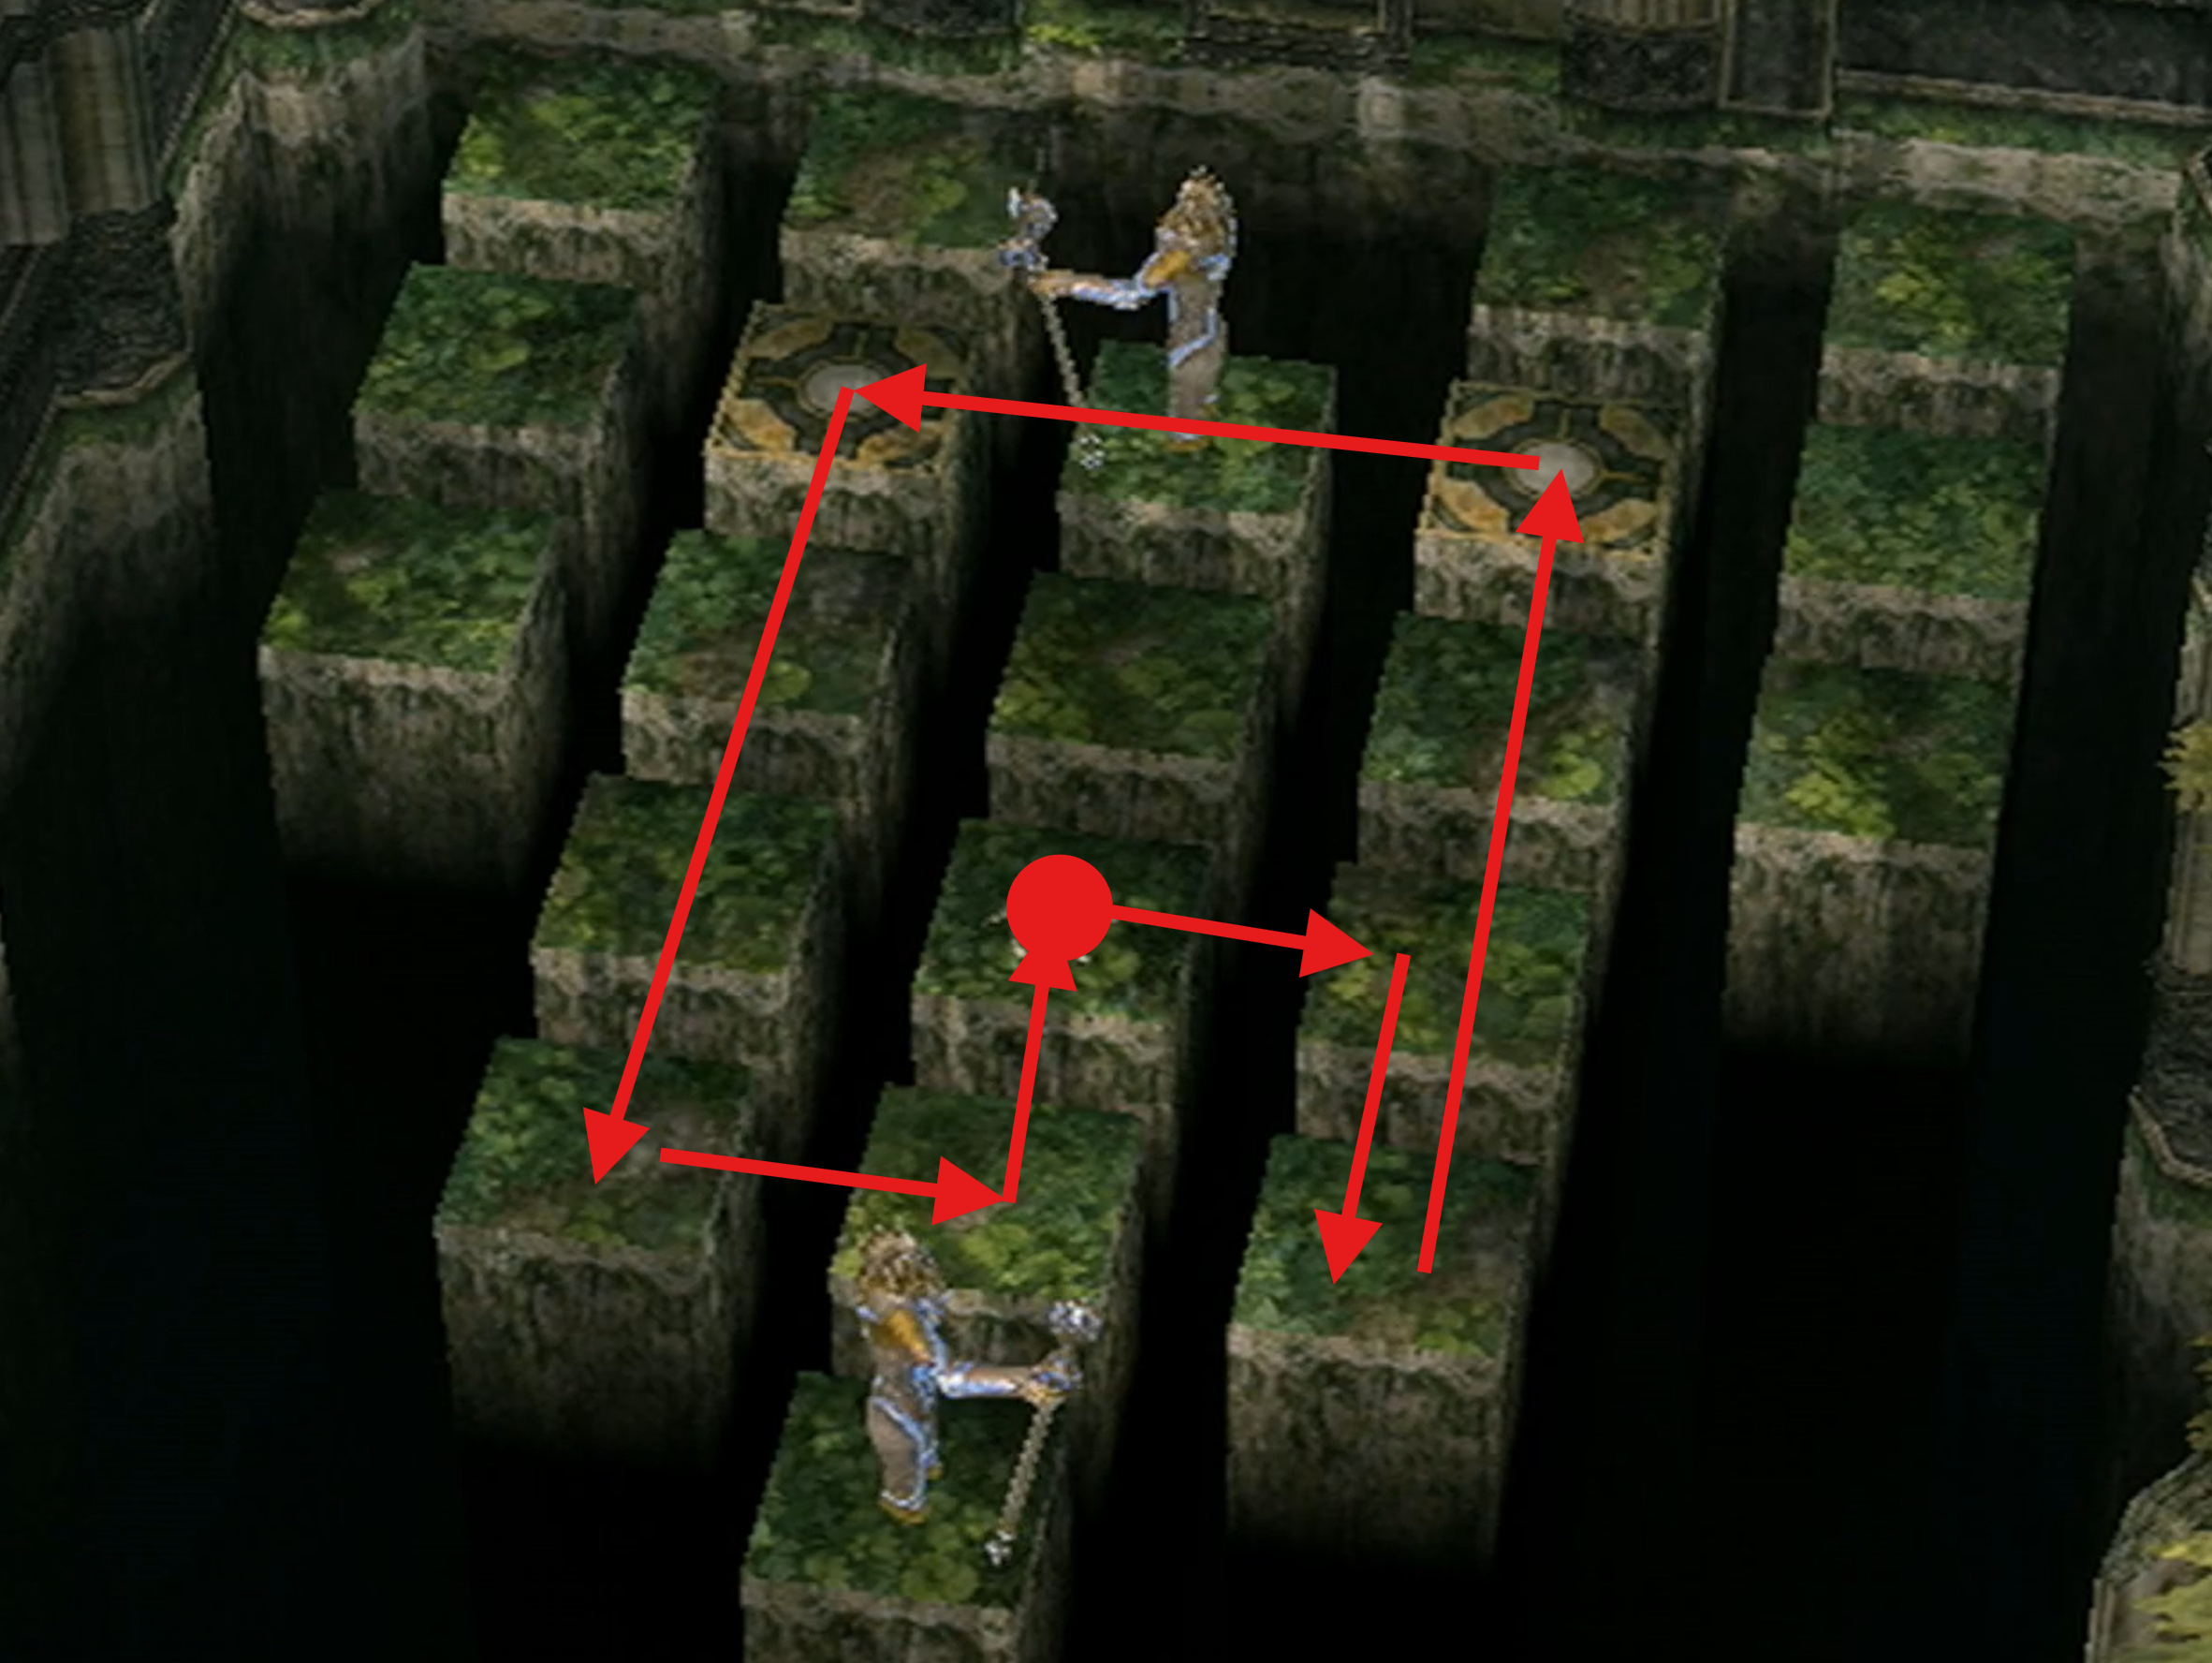
- Warp S. Faron
- Collect missed tears on the way to the tunnel
- Collect missed tears in mist area
- Cross purple mist with lantern
- Transform and kill bugs before they dig
- While waiting for tears, dig behind sign and jump attack to collect a yellow rupee (18R+)
- N. Faron warp portal
- Kill last two bugs
- Turn senses off, transform, burn web, and collect tears
- Vessel complete
- Backflip to skip text (1-frame window)
- Warp N. Faron
- Ending Blow
- Enter Forest Temple
Forest Temple
- Save 1st Monkey, knock down Walltulas with nuts
- Defeat Skulltula and light torches
- Go outside, skip CS, go back
- Monkey swing to west door
- Small key chest past bridge
- Save 2nd Monkey
- Back to center room + burn web
- Early Boomerang Via Bridges
- Ook and Gale Boomerang
- [Boomerang (B) / Lantern]
- Save “5th” monkey outside
- Deku Like Skip with Boomerang
- Enter door behind boulder
- Small key and light torches
- Open door with key (Saves “3rd” monkey)
- Head to Big Baba room
- Quick Major Deku Baba Fight
- Open door with key (Saves “4th” monkey)
- Go back through Center room
- Boss Key with fence hop
- Head north to monkey room
- Knock down Walltulas with boomerang, climb vines
- Deku Like Skip #2 for small key
- Rescue 6th monkey with 1 bombling
- Rescue 7th monkey
- Rescue 8th monkey with tile worm boost
- Complete monkey chain, go to Diababa
- Diababa
- Heart Container optional
- Exit Forest Temple
Eldin Province
- Dash to Hyrule Field South
- Mail Man Skips as Wolf
- Alternatively, call Epona and dash into the trigger (~10s slower)
- Enter Eldin Twilight
- Kakariko Gorge Portal
- Forced warp N. Faron
- Warp bridge to Gorge
- 1 frame JA or B attack to skip Midna text
- No need to avoid KB1 trigger
- Kakariko Village Portal
- Eldin Vessel
- Enter graveyard
- Kill graveyard bug (leave tear)
- Well Clip once bug explodes
- 3 basement bugs
- Graveyard bug tear
- Malo Mart bug
- 2 hotel bugs (don't need yellow)
- Abandoned house bug
- Barnes' Shop bug
- Bomb House Skip as wolf, collect 3 tears
- Watchtower bug (26R+)
- DMT bug
- Death Mountain warp portal
- 2 Death Mountain bugs
- Transform human before collecting last tear
- Vessel Complete
Lanayru Vessel
- No Midna text after cutscene
- Dash To DMT
- Midna jump up to goron trigger
- Warp Kakariko after goron's text
- Tame Epona as wolf (first input is right)
- Warp S. Faron
- Dash to Ordon
- Get Orange Rupee behind Rusl's house with boomerang (126R)
- Enter Bo's House
- Iron Boots
- [Boomerang (B) / Iron Boots / Lantern]
- Don't forget about this equip if doing kargarok drowning
- Warp S. Faron
- Dash back to Hyrule Field, then to east part of HFS
- Lanayru Gate Clip
- Skip bridge burning cutscene
- Kargarok fight as wolf
- Kargarok flight
- Be careful with aiming towards the middle of the screen
- Zora's Domain warp portal
- Warp Death Mountain
- Transform in the corner
- Lantern to B
- Warp meteor to Zora's Domain as human
- One frame sidehop to skip Midna text
- Rutela CS skip
- Enter Lanayru Shrine once in Lake Hylia
Lanayru Twilight
- Lanayru Vessel
- Bug outside Lanayru spring
- Lake Hylia warp portal
- Stepping stones for bug (127R)
- Warp Zora's Domain
- Wall bug and Rutela skip
- Waterfall Sidehop or drop down right wall to bug (130R+)
- If you fail waterfall sidehop, use Midna jumps to climb back up
- 2 lilypad bugs (Try your best to keep them dry on NTSC-U 1.0)
- Bug on cliff with RNG rupees in grass patches and boxes (134R+)
- Swim to Upper Zora's River (UZR)
- Listen to Iza for bug (135R+)
- Down the river
- Dash to Castle Town
- Castle Town warp portal
- Dash cancel through Castle Town
- Castle Town bug
- Warp Lake Hylia
- Bug behind Fyer's hut (Keep it dry on NTSC-U 1.0)
- Howl at grass
- 4 Kargarok bugs, bonk, and press B to say 'No' to Midna
- Last small bug
- Boss Bug
- Vessel Complete
Zora Armor
(NOTE: During wagon escort dashing through grass can give extra rupees)
- Warp Zora's Domain
- Dash to Upper Zora's River
- Fight messengers as wolf to receive lent bag from Iza
- Warp Upper Zora's River for the permanent bomb bag
- If you plan to use a normal bomb underwater to get to Deku Toad and Midna Dive into Lakebed (saves ~12s), talk to Iza again between receiving the permanent bomb bag and warping away so that she fills the bomb bag
- Otherwise no need to talk to Iza again
- [Boomerang (B) / Boomerang / Boomerang / Boomerang] (automatic)
- Warp Castle Town
- Mailman skip (NTSC-U 1.0 Only)
- Enter Castle Town as human
- Enter Telma's Bar (Starts Wagon Escort)
- Bulblin 2 Skip
- Wait for wagon to catch fire and use Boomerang
- Open gate and wait for wagon to go through
- Kill all three Boar Riders
- Kill bomb Kargaroks with Boomerang
- KB1 trigger skip
- Follow Zora Queen to Graveyard
- Zora Armor
Lakebed Temple
- Warp Lake Hylia
- If doing Midna Dive (only possible if you talked to Iza to fill the duped bag):
- Dash past Fyer's hut all the way to the Isle of Riches (layered platforms)
- Transform, pause, and equip Zora Armor + enable Icon Shortcuts
- [Bombs (B) / Boomerang / Iron Boots / Lantern]
- Midna Dive with bomb to Lakebed Entrance
- If doing Pillar Clip:
- Dash down+right and go past the first bridge, then near the water
- Transform and jump into the water
- Equip Zora Armor + enable Icon Shortcuts
- [Empty Bomb Bag (B) / Boomerang / Iron Boots / Lantern]
- Pillar Clip with Zora Armor
- Swim through the water to the top
- Open water bomb chest (10WB)
- Skip this if using a normal bomb underwater to get to Deku Toad
- Drop stalactites with bomb + boomerang (8WB)
- Staircase room
- Down stairs, around, pull south lever
- Up stairs, to the left, jump off the edge and slide off awning to the lower floor
- Enter single cog 1F room
- Pot Push to Deku Toad (6WB)
- If failed, reload the room to reset the pots
- Moon boots from chest to railing
- [Water Bombs (B) / Boomerang / Null Item / Lantern]
- Blow up the rock with a water bomb or with a normal bomb underwater depending on the bomb bag choices you made earlier (5WB)
- Jump down, swim to Deku Toad
- 0-cycle Deku Toad (4WB)
- If failed, standard 1-cycle Deku Toad
- Clawshot
- [Clawshot (B) / Water Bombs / Iron Boots / Lantern]
- Back to main room
- Vine Clip with clawshot (faster) or bombs
- Morpheel
- [Clawshot (B) / Water Bombs / Lantern / Boomerang] for final regrab
- Heart Container
- Bomb bag fills with 30B on leaving the dungeon
- Equips revert to what they were before bomb duping
- [Lantern (B) / Iron Boots / Boomerang] (automatic)
Midna's Desperate Hour
- Transform wolf and dash to Castle Town
- Dash cancel through Castle Town
- Enter Telma's bar through the door and get kicked out
- Louise Glitch (saves about 1.7s)
- Push box once and dash jump to window
- Ropes in bar or rope skip (risky, saves about 3s)
- Poe
- Enter sewers
- Burn first web as wolf with the right stick
- Transform at second web and use Lantern
- [Clawshot (B) / Bombs / Iron Boots / Boomerang]
- Dig into hole
- Bulblin Archer
- Exit tower
- Early Wind Cycle
- Zelda cutscene
Getting to Snowpeak Ruins
- Warp Zora's Domain and exit on land
- Jump down without taking damage
- Enter Peak Province
- Map Glitch
- Alternatively, do wolfos superjump, which is faster in theory but is risky, difficult, partially rng-based, and hard to save time with RTA
» Snowpeak Howling Stone (only howl once, then leave)
[ ](https://www.zeldaspeedruns.com/tp/knowledge/general-tips#howling-stone-songs)
- With wolfos superjump, howling is not needed
- Snowpeak messenger skip
- Blind snowboarding
- Try to get treetop rupees
- Shortcut rupees (160R)
- Hearts from pots (4 hearts)
- Enter Snowpeak Ruins
Snowpeak Ruins
- Enter Snowpeak Ruins
- Yeta
- Yeto
- Block Puzzle Room
- Dig to Courtyard
- Jump Attack Moon Boots Bomb Boost over the wall (3.5 hearts)
- [Bombs (B) / Clawshot / Lantern / Boomerang]
- Freezard Skip (3 hearts)
- Darkhammer 1-Cycle with bomb
- Ball & Chain
- [Ball & Chain (B) / Clawshot / Lantern / Boomerang]
- Exit to Courtyard (Leave ZA on for 2.5 hearts damage) (0.5 hearts)
- Enter Lobby
- Get Orange Rupee in the armor (260R)
- No need to skip text if you didn't skip text in Ordon
- Leave Snowpeak
- Grab 1 heart from pot
Desert Province
- Warp Lake Hylia
- Get Auru's Memo
- Dash Down to Fyer
- Boomerang red rupee from front of Fyer's cannon (280R+) if needed
- [Auru's Memo (B) / Clawshot / Lantern / Ball & Chain]
- Show Memo and go to Desert Province
- Ball & Chain to B while waiting for Fyer to move out of the way
- Enter Bulblin Camp without a Boar
- Map Glitch to KB3
- Alternatively, clear the camp (only ~8s slower)
- Defeat KB3
- Enter Arbiter's Grounds as Human
Arbiter's Grounds
- Human entrance
- Pull chain
- Small key
- Torch room
- [Clawshot (B) / Ball & Chain / Iron Boots / Boomerang] between lighting torch and door to automatically put lantern away
- Poe door cutscene
- Poe Gate Skip
- [Boomerang (B) / Ball & Chain / Bombs / Clawshot] on Ending Blow Moon Boots
- Boss key early
- If traversing next room as human, get boss key now; if using wolf, get boss key on the way to Stallord
- Full human movement after boss key
- or stay wolf (roughly 2s slower)
- Triple Stalfos Skip with 3pcc or step clip (comparison)
- 2R in pots in front of Death Sword's door if needed
- Enter Death Sword
»Skip or fight [Death Sword](https://zeldaspeedruns.com/tp/boss/death-sword)
- Skipping Death Sword and deathwarping is 18s faster than killing Death Sword and exiting the room ([comparison](https://www.youtube.com/watch?v=_AfNz1YnyfE&list=PLdhP204jznp4Bmbd5l9bYhkGRyCf6mwNg&index=32)), not including time spent damaging down (~5s optimally)
- If skipping Death Sword, put bombs to B while waiting in the corner before transforming
- Spinner
- Deathwarp with bomb and spinner (3 hearts)
- [Spinner (B) / Bombs / Boomerang / Clawshot]
- Die to Death Sword if low on bombs or high on health
- Spinner to door
- Epic spinner room
- Open boss key chest if you didn't already
- Spinner to socket
- Get blue rupee in the skull if needed - want 280R+ before warping the sky cannon
- Enter boss room
- Stallord
- One-Cycle in phase 2
- Jump Attack into clockwise autospin
- Left slash, right slash, forward stab
- Repeat three times
- Skip Heart Container
- Spinner out to exit Arbiter's Grounds
Getting to City in the Sky
- Mirror Chamber warp portal with a bomb
- Get hit once before killing the last group of messengers (2.5 hearts)
- Warp Kakariko
- Must zoom in to enable portals when warping from here on out
- Early City in the Sky
- Press Dpad Up to talk to Midna about cannon
- Press B to say 'No' to Midna
- Map warp to Lake Hylia
- Boomerang red rupee from front of Fyer's cannon (300R) if needed
- If you are short on rupees, Fyer has 60
- [Clawshot (B) / Bombs / Iron Boots / Spinner]
- Pay Fyer 300R to fix cannon, enter cannon
City in the Sky
- Second room movement
- Fan Trigger Skip for early boss key
- Exit via window on right
- Bridge
- Small Key
- Void out instead of backtracking (1.5 hearts)
- Argorok Cutscene Skip
- West Wing
- Get to Aeralfos early with 3pcc
- (0.5 hearts)
- Aeralfos Skip
- Don't break the pot to avoid getting health
- Double Clawshots
- Deathwarp with bomb
- Exit room
- [Clawshots (B) / Bombs / Iron Boots / Boomerang]
- Clawshot around walls
- Clawshot pull switch and enter door
- Clawshot across
- Stand on the very edge
- Boomerang first Deku Baba down
- Clawshot as far back as you can
- Clawshot down furthest Deku Baba
- Clawshot to furthest netting (You can skip one)
- Clawshot vines and enter main room
- Clawshot to 3F
- Clawshot through floor to boss key chest
- Boss Key
- Drop down
- Skip turning on fans
- Fan tower
- Enter boss door
- Skip cutscene to warp to top (NTSC-U 1.0 Only)
- Argorok
- Heart Container
- Put on Iron Boots and enter cannon to exit City in the Sky
Palace of Twilight
- Shake right away to jump attack and land on the bridge
- Warp Mirror Chamber
- Enter Palace
- East room 1 with double hit
- East room 2 and jump attack from chest
- Phantom Zant 1
- East sol with Midna text skip
- East room 2 return
- East room 1 return
- Exit east wing
- Place sol 1
- West room 1 without hidden skills
- West room 2
- Phantom Zant 2
- West sol
- West room 2 return
- West room 1 return
- Light Sword with optimizations
- Enter north wing
- Skip the staircase or place sols in sockets (~5s slower)
- Small key with faster platform spawn
- Boss key area
- Don't forget the boss key
- Early Platform room
- Kill the waves of shadow beasts
- Enter Zant
- Zant with Zora Armor
- [Clawshots (B) / Bombs / Ball & Chain / Boomerang] after Morpheel phase
- Skip Heart Container
- Exit Palace of Twilight
Hyrule Castle
- Warp Castle Town
- Mailman skip (NA 1.0 Only)
- Squidna Cutscene
- Enter Hyrule Castle
- Barrier 1 with bomb
- Skip Barrier 2
- King Bulblin 4
- Midna text
- Backtrack
- Enter Castle (Clawshots to B before opening door)
- Barrier 3 Skip
- Clawshot to second floor
- Darknut with torch optimization
- [Lantern (B) / Bombs / Boomerang / Clawshots]
- Enter puzzle room (right door)
- Torch puzzle
- Dynalfos with bomb
- Aeralfos
- [Ball & Chain (B) / Spinner / Boomerang / Clawshots]
- Small Key
- Boss Key
- Enter tower
- Block room shortcut
- Second lizalfos fight
- Spinner up
- Skip final darknut
- Enter final battle
- Ganondorf