GCN バグなし (JP Glitchless) MS-After
This run starts from a savefile just after obtaining the Master Sword. For exact specifications, check the speedrun.com rules.
The Rupee route in this run hinges on a single factor: Once you get to Castle Town for the sidequests, you want to be at or below 200R so you can collect a 100R Chest. If you have more than 200R you will be unable to collect this and will need a backup instead (written in route)
Gerudo Desert
Warp to Lake Hylia
Auru's Memo
Swim to Fyer with ZA
Show Memo and go to Desert Province
Use Boar to get into Bulblin Camp
Get Small Key
King Bulblin 3
Enter Arbiter's Grounds as Human
Arbiter's Grounds
First room as Human Pull chain
Small Key
Light torches, transform Wolf before central chamber
Poe 1 + Poe Scent
Pull chain + enter downstairs door
Small Key
Redead 1 [70R]
Poe 2 Back to main room
Climb stairs and enter door behind you
Pull block once, then pull the chandelier up
Small Key
Skip the Redead guarding the Key
Use 1 Bomb Arrow + Stab to kill each Redead [110R+]
Poe 3
Small Key
Enter central chamber
Across chandelier into next room
Push block 8 times
Pull the chandelier chain
Transform and roll under chandelier
Enter door
Bomb Arrow Stalfos
Light Torches
Poe 4 Back to central chamber
Go through Poe Door
Early Boss Key
Ignore Boss Key, enter next room
Bomb Chest near the door on the other side of the room
Kill Stalfos with Bombs
Enter Death Sword room
Deathsword 1-Cycle Spinner
Leave, head to big spinner room
Use spinner tracks to get back to Boss Key
Get Boss Key
Head to Boss Room
Stallord
Snowpeak
Open Mirror Chamber warp portal
Raise Mirror
Warp ZD and get Ashei's Sketch
Warp Kakariko
Go to Graveyard and show Sketch to Ralis
Warp ZD and fish for Reekfish
Climb Snowpeak
Snowpeak warp portal
Snowboarding (collect Rupees on the shortcut) [130R+]
Can try for Purple&Red from treetops to save time later [200R+, don't go over 210R!]
Enter SPR
Snowpeak Ruins with LFC (Optimal)
Talk to Yeta to get Map
Enter next room and talk to Yeto
Block puzzle
Enter courtyard and dig under wall
Spinner Bomb Boost Push cannon to aim at Freezard
Get Small Key under snow
Unlock door and take cannon ball to cannon
Kill Freezard
Darkhammer Ball & Chain
Back to courtyard
Ladder Freezard Cancel to reach ChapelDefeat Chillfos before Boss Key
Boss Key
Blizzeta
Snowpeak Ruins without LFC
Talk to Yeta to get Map
Enter next room and talk to Yeto
Block puzzle
Enter courtyard and dig under wall
Spinner Bomb Boost Push cannon to aim at Freezard
Get Small Key under snow
Unlock door and take cannon ball to cannon
Kill Freezard
Darkhammer 1-Cycle with bomb (towards courtyard)Ball & Chain
Back to courtyard
Break Ice, then dig up Small Key
Bomb Boost to Top Floor Enter door nearest to you and then the door on your right
Enter next door on your right
Kill Freezards and move blocks with B&C
Move cannon to aim into room
Go to bottom floor and kill Freezards on the way.
Go through Door next to Lever
Bring cannon ball back to cannon on top floor
Shoot it into the room, then transfer the ball into the outside cannon
Shoot courtyard cannon at Freezard
Defeat Chillfos before Boss Key
Boss Key
Blizzeta
Temple of Time
Warp N. Faron
Use Golden Cuccoo to get to Sacred Grove
Skull Kid 2 (chase as Human)
Light torches to get Bomb Chest
Grove warp portal
Enter Temple of Time
Break left pot for guaranteed 20 Arrows
Pot on pressure plate
Small Key with Lantern
Gate Skip 1 Gate Skip 2 (Bomb Arrow Lizalfos)Head Upstairs using Spinner
Skip using Elevator Kill Armos with Bomb Arrows
Small Key and exit back to previous room
Avoid Blade Traps and enter next room
Slash crystal switch
Skip Shooting Crystal again Bomb Arrow Crystal Switch 3 times moving onto next section each time
Bomb Arrow all enemies that have grouped up in the last section
Boss Key Early with Clawshot from the edge of the scales
Boss Key
L-target to shoot Bomb Arrow straight ahead to kill Armos
Clawshot each Helmasaur’s shell, then spin attack to kill both
Can grab Red Rupee from small chest if low on Rupees
Exit Boss Key room
Jump Down and enter door
Small Key
Optionally, Bomb Arrow the Lizalfos
Electric Gate Skip with Clawshot Kill Armos
Darknut Dominion Rod
Bring Statue out of Darknut room
Smash rolling spikes with Statue if needed
Blade Trap Room Scales Skip Break Movable Walls with Statue
Circle Room Put Statue in bell
Exit Room
Clawshot over gate
Smash next gate with Statue
Unlock Door of Time
Room Before Boss Break Pot before Boss Door for 20A if needed
Armogohma
Collect Arrows+Hearts while waiting for cycles
Getting to City in the Sky
Exit ToT
Warp Castle Town
Transform Wolf & Dash to Bridge of Eldin
Bridge of Eldin Portal
Warp Lake Hylia
Use Fyer's Cannon to Gerudo Desert [120R+ / 190R+]
Dash to Gerudo Mesa
Gerudo Mesa Portal
Warp Bridge to Bridge of Eldin
Warp to Kakariko
Get Renado's Letter
Warp Castle Town
Give Letter to Telma
Show Invoice to Doctor
Get Medicine Scent and talk to Cat outside Bar
If between 150R and 200R, collect spinner 100R before Stalhounds
Wooden Statue
Collect rupees from Stalhounds [300R , there are extra rupees in South Faron as well]
Warp Kakariko and show Ilia the statue
Warp to Bridge of Eldin
Enter Hidden Village
Bulblin Archery
Show Rod to Impa
Use special spot to warp to Kakariko
If needed, Shoot Bell with Bomb Arrow for Silver Rupee [300R]
This is a backup purely in case you went over 200R before Stalhounds
Show Shad the book to restore Dominion Rod
Warp Eldin Bridge and get 1st Rune
Warp Castle Town and get 2nd Rune
Dash to Lake Hylia bridge and get 3rd Rune
Warp to Mesa and get 4th Rune
Warp to South Faron and get 5th Rune behind boulder
Collect Rupees from Boulder if needed [300R]
Warp Kak Gorge and get 6th Rune
Warp to Kakariko and show Shad the finished book
Warp Cannon to Lake Hylia
Fix Cannon [0R]
Enter City
City in the Sky
Shoot Crystal Switch with Clawshot
Skip using clawshot in second room Exit central room through window
Spinner to extend bridge Small Key
Argorok Cutscene Skip Enter East wing
Spinner to extend bridge Roll past two fans then use Boots and sidehop across blue blocks Mix jumps and jumpslashes to cross block room
Throw Boomerang to get rid of final Tile Worm
Quick Dynalfos Fight Ooccoo Jump Jump down or use Ooccoo to get to Mini-Boss door
Aeralfos 1-cycle Double Clawshots
Clawshot the target on the left, move down, then Clawshot the switch
Exit the Room
Grab Arrows from pot before leaving
Clawshot around the room up to the switch
Clawshot to the door behind the open gate and enter it
Clawshot across the targets and enter door
Clawshot the Babas to bring them down then Clawshot across, enter central room
Exit central room through west window again (saves ~4s over using door)
Go across the bridge and enter the door
Stand by the Vines and Clawshot down across
Clawshots up to left ledge
Drop down to the lower area
Clawshot Crystal Switch
Clawshot to bring Babas down
Clawshot your way up and enter the Big Baba room
Distract Big Baba and Clawshot up to target
Clawshot to vines and walk across thin platforms
Clawshot up pillars and down into center of room. Enter door
Fast Peahat Cycle
Peahat eLJA Enter door
Clawshot across Peahats
Clawshot up to vines (precise)
Turn Wolf and walk across the ropes
Optional: Jump Attack at the Kargaroks
Go to door, transform before entering
Sidehop+Equip Boots, then Clawshot lever
Boss Key
Jump down the hole and Clawshot the grate at the top, then lower downwards
Clawshot lever to activate the Fan
Head outside and use the fans to get Across
Enter fan tower
Clawshot your way up the room and open the Boss Door
Argorok
Palace of Twilight
Hyrule Castle
Leave Palace of Twilight
Warp Castle Town
Mailman then enter Castle Town
Squidna cutscene
Enter Hyrule Courtyard
Barrier 1 with Bomb Arrow
Barrier 2 with Bomb Arrows
Beat KB4 and get Key
Roll back to the entrance and enter the Castle
Barrier 4 with Bomb Arrows
Clawshot up and enter the door
Darknut Room Enter puzzle room (right door)
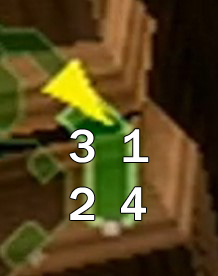
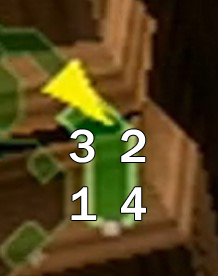
» Torch puzzle (NE, SW, NW, SE)
» SW, NE, NW, SE (1s slower but safer)
Last updated 04/23/2026 – bewildebeest