
All Dungeons (No TD)
Note that this route is about 1m30s slower than the fastest route. The key differences are that this route does not skip Map Glitch with Universal Map Delay or do Rusl Text Displacement to get into Goron Mines.
Runs should start with a blank file in slots 1, 2, and 3 as all files are used during the run.
It is helpful to watch a reference run when learning, as this route document can only go into so much detail. The top runs on the leaderboard use the optimal route, but these older runs follow this route:
Ordon
- Faron Gate Clip
- Back in Time on Ordon Bridge
- BiT Save File 1
- Lantern
- Save Talo
- Goats
- Iron Boots
- Save over File 2 outside Bo's house
- Castle sewers
- Castle rooftops
- Sword & Shield Skip
Faron Province
- South Faron warp portal
- Faron Vessel
- Kill first two bugs (leave tears)
- Bug on Coro's house
- Bugs inside Coro's house
- Dig under gate, kill bugs, enter loading zone after sound effect (leave tears)
- Tunnel
- Bugs on right wall (leave tears)
- Bugs in tree trunk
- Ignore bugs that dig
- EMS
- Save over File 1 in Grove (before howling)
- Skull Kid chase 1
- Skull Kid fight 1
» Master Sword puzzle (LD UUU RR DDD LU)
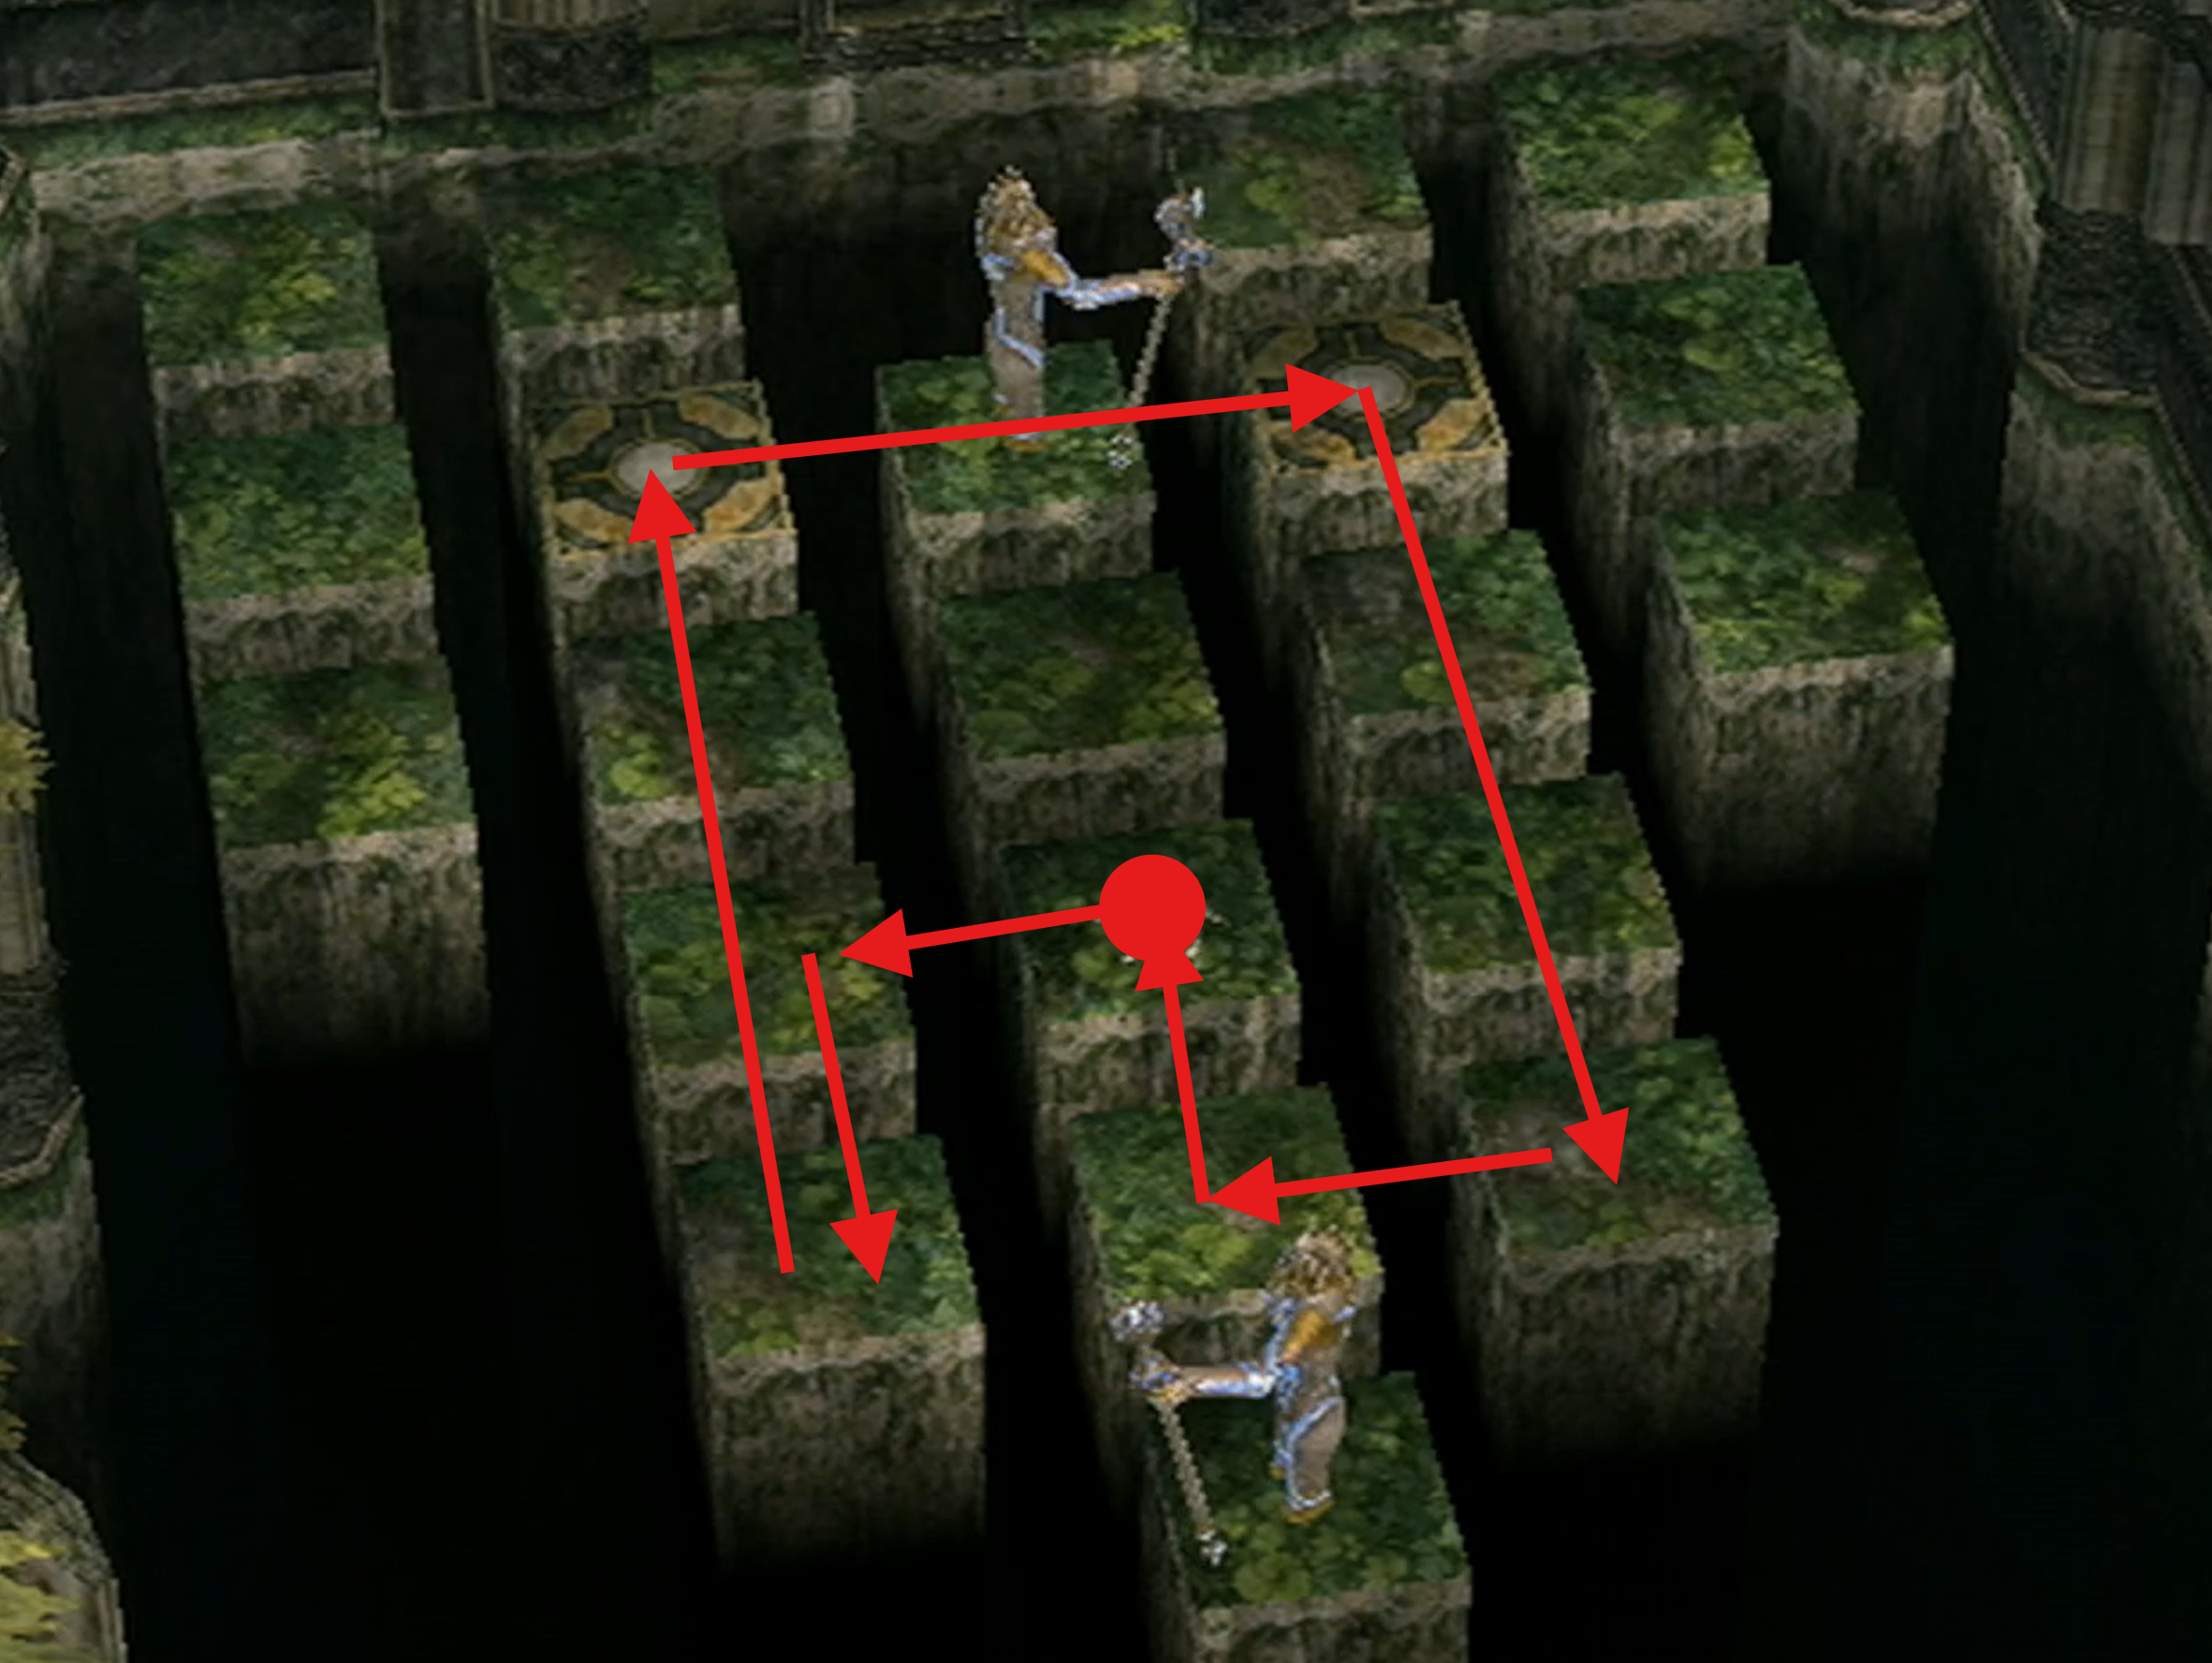
- Warp South Faron
- Collect missed tears
- Enter the purple mist area and grab two tears
- Cross purple mist with lantern
- Transform and kill bugs before they dig
- While waiting for tears, dig behind sign and jump attack to collect a yellow rupee (10R)
- North Faron warp portal
- Kill last two bugs
- Turn senses off, transform, burn web, and enter Forest Temple
Forest Temple Part 1
- Early Monkeys
- Save on File 3 (if using save prompt buffer BiT in the following step, this is built in)
- BiT behind load zone (save prompt buffer method is fastest)
- Perform BiTE and load File 2 (South Faron) to spawn in the King Bulblin fight
- Set Early Boss Fights (EBF)
- Note that EBF will remain set after Ook and will be reused on Deku Toad later. EBF will not remain set if the console is powered off or if Link voids in the outdoor room in Forest Temple where the monkey chain is.
- Load File 3 (Forest Temple)
- Kill one or both walltulas with deku baba nuts
- Alternatively, try to climb past one or both walltulas (requires good RNG)
- Light torches
- Cross over monkey chain to Ook
- Ook
- Boomerang
- Savewarp
- Leave Forest Temple
- Collect last 2 tears as human to finish Faron Vessel
Early Clawshot
- Backflip to skip text (1-frame trick)
- Faron Escape
- Lanayru Gate Clip as wolf
- Drop into Lake Hylia as human
- Pillar Clip into Lakebed Temple
- Savewarp
- First Room
- Skip Stalactites
- Double LJA to Skip Staircase
- Pull lever and enter next room
- Skip stalactites
- Descend staircase and turn the bridge at the south side of floor 1
- Ascend staircase to Ooccoo
- Slide off awning to the lower floor
- Head to Deku Toad through east door of floor 1
- Early Deku Toad
- 1-cycle with Master Sword
- Clawshot
- Savewarp
- Ooccoo out of Lakebed
- Kargarok Skip with Iron Boots
- Faster Kargarok flight
- Zora's Domain warp portal
- Warp North Faron
- Ending Blow
- Enter Forest Temple again
Forest Temple Part 2
- Clawshot to skip climbing vines in first room
- Clawshot vines to right door in central room
- Big Key (clawshot up the vines before deku baba attacks)
- Cross outdoor area and bridge room
- LJA to the boss door
- Diababa
- Heart Container
- Exit Forest Temple
Getting to Eldin Vessel
- Call Epona
- Ride Epona to Eldin
- Postman Skip
- Enter Eldin Province
- Kakariko Gorge warp portal
- Warp North Faron (forced warp to Faron)
- Warp bridge to Kakariko Gorge
- Avoid King Bulblin 1 trigger (dig under gate and hug the wall)
- Enter Kakariko
- Kakariko warp portal
- Eldin Vessel
Eldin Twilight
- Call Midna and advance through her textboxes to learn to climb tree (press Z once)
- Enter graveyard
- Kill graveyard bug (leave tear)
- Well Clip
- 3 basement bugs
- Graveyard bug tear
- Malo Mart bug
- 2 hotel bugs
- Abandoned house bug
- Barnes' Shop bug
- Bomb House Skip, collect 3 tears
- Watchtower bug (15R+)
- DMT bug
- Death Mountain warp portal
- 2 Death Mountain bugs
- Vessel complete
Lanayru Twilight
- Warp Death Mountain
- Transform in the corner
- Warp rock to Zora's Domain as human
- Rutela Skip
- Lanayru Vessel
- Bug outside Lanayru spring
- Lake Hylia warp portal
- Stepping stones for bug
- Warp Zora's Domain
- Wall bug and Rutela Skip
- Waterfall Sidehop or drop down right wall to bug
- 2 lilypad bugs
- Bug on cliff (RNG rupees in grass)
- Listen to Iza for bug
- Down the river
- Castle Town warp portal
- Dash cancel through Castle Town
- Castle Town bug
- Warp Lake Hylia
- Bug behind Fyer's house
- Howl at grass
- 4 Kargarok bugs, bonk, and press B to say 'No' to Midna
- Last small bug
- Boss Bug
- Vessel complete
Lakebed Temple
- Warp Zora's Domain
- Upper Zora River warp portal
- Steal Lent bomb Bag with Ooccoo
- Skip stalactites
- Knock down stalactites with a bomb
- Quick bomb dosposal
- Open water bomb chest (10WB)
- Enter main room
- Ooccoo out- Warp Zora's Domain
- Goron Bomb Bag with water bomb
- Rocket Link
- Ooccoo back to Lakebed
- Jump onto the bridge below on the left side
- Big Key Skip (top of stairs north)
- Morpheel without Zora Armor
- Heart Container
- Exit Lakebed Temple
Midna's Desperate Hour
- Transform wolf
- Dash to Castle Town
- Enter Telma's Bar through the door
- Louise Glitch (saves about 1.7s)
- Push box once and dash jump to window
- Ropes in bar
- Poe
- Enter sewers
- Burn first web as wolf with stick
- Transform at 2nd web and use lantern
- Dig into hole
- Bulblin archer
- Exit tower
- Early Wind Cycle
- Zelda cutscene
Peak Province
(NOTE: You will need to empty all your bombs before City in the Sky. However, you want to leave 2 bombs for Arbiter's Grounds and 1 bomb for getting the 200R in the bell at kakariko. It is recommended to leave a few spare for this rupee or save before attempting.)
- Warp Zora's Domain
- Enter Peak Province
- Map Glitch
- Howling stone (Exit after howling once)
- Cave
- Snowpeak Messenger Skip
- Blind snowboarding
- Enter Snowpeak Ruins
Snowpeak Ruins
- Enter door on the left
- Early Heart Piece 2 (don't need the heart piece)
- Clawshot through the ceiling and enter door
- Jump down or clawshot to door below
- Ice Block Clip
- Freezard Skip
- Darkhammer 1-Cycle with bomb (towards courtyard)
- Ball & Chain
- Return to courtyard
- Break ice wall
- Bomb boost to 2nd level (stay on wall)
- LJA to middle platform
- LJA to Bedroom Key room
- Red rupee from chilfos if available (50R)
- Bedroom Key
- Blizzeta
- Heart Container
- Exit Snowpeak Ruins
Desert Province
- Warp Lake Hylia
- Get Memo
- Dash down to Fyer
- Show Memo and go to Desert Province
- Enter Bulblin Camp without a boar
- Map Glitch to King Bulblin
- Enter Arbiter's Grounds as human
Arbiter's Grounds
- Human entrance
- Pull chain
- Small Key
- Torch room
- Poe door cutscene
- Enter left room
- Poe 1 Skip
- LJA to the door
- Stalfos with Ball & Chain
- Light front and left torches
- Poe 4
- Poe Scent
- Leave room
- Jump to the other side using chandelier
- Push the large metal box 4 times
- Open red rupee chest if needed
- Main room
- Pull chain, enter downstairs door
- Small Key
- Redead 1 (70R)
- Poe 2
- Return to main room
- Enter left room
- Climb the destroyed stairs past the large metal box
- Cross upper floor of main room on chandelier
- Drown in the sand if you accidentally fall down to respawn by the upper door
- Enter ghost rat room backwards (don't get the key)
- Poe 3 room backwards
- Pick up red rupee from redead if needed
- Back to main room, enter big door
- Boss Key Early (get blue rupee in the skull if needed)
- Backwards spinner room as human or transform wolf
- Stalfos with bombs (13 WB)
- Use Ball & Chain if you need to preserve bombs
- Death Sword
- Spinner
- Savewarp
- Enter Boss Room
- Skip or fight Stallord
- Can skip Heart Container
- Exit Arbiter's Grounds
Getting to Goron Mines
- Mirror Chamber warp portal
- If you didn't skip Stallord, you have to zoom in all the way on the map then press Z to enable portals from now on
- Warp Death Mountain
- Early Elevator
- Agree to Goron Bo
- Exit and re-enter
- Enter Goron Mines
Goron Mines
- Skip first two flame jets
- LJA to platform over lava
- Kitty climb
- Main room with moving magnets
- Underwater Small Key
- Clawshot crystal switch
- Skip cutting down bridge
- Outside area Small Key
- Enter East door
- Skip Shard 2
- Dangoro
- Hero's Bow
- Big Key (Shard 3)
- Return to outside area
- Clawshot to netting on the right
- Jump down and go to next room
- Room before Fyrus
- Fyrus
- Can skip Heart Container
- Exit Goron Mines
Getting to City in the Sky
(NOTE: When entering CitS, you should have an empty Bomb Bag.)
- Midna jump To bell
- BA the bell (empty bomb bag if not already empty)
- Boomerang the silver rupee and sidehop down to enter sanctuary via back door (300R)
- Early City in the Sky
- Fix cannon
- If you are short on rupees, Fyer has 60
- Enter City in the Sky
City in the Sky
- Open underwater water bomb chest (15WB)
- LJAs over first room
- Fan Trigger Skip for early boss key
- Exit via window on left
- Bridge
- Small Key
- Argorok Cutscene Skip
- Enter East Wing
- Bridge
- Fan room
- Block room LJAs
- Quick Dynalfos fight
- Ooccoo Jump
- Skydive to Aeralfos (or jump down with ooccoo if at 2 hearts or less)
- Aeralfos Skip
- Double Clawshots
- Savewarp
- Return to main room via window (the Argorok cutscene trigger is now gone)
- Clawshot through floor to boss key chest
- Big Key
- Drop down
- Skip turning on fans
- Fan tower
- Enter boss door
- Clawshot vines
- Argorok
- Get health from up to 3 skulls during phase 1 if planning to skip Heart Container
- Can skip Heart Container
- Equip Iron Boots and enter cannon to exit City in the Sky
Getting to Temple of Time
- Mash B to jump attack and land on the bridge
- Warp North Faron
- Bomb boost to Lost Woods
- Skull Kid 2
- Strike Master Sword pedestal
- Sacred Grove warp portal
- Enter Temple of Time
Temple of Time
- Pot on pressure plate
- Small Key
- Skip Ooccoo
- Gate Skip 1
- Gate Skip 2
- Up stairs using spinner
- Skip using block
- BA Armos
- Small Key
- Cross circle room and use Small Key
- Slash crystal switch
- Skip shooting crystal again
- BA crystal switch 3 times while crossing room
- Can spin attack or BA surrounding enemies in the third area
- Big Key Early
- Big Key
- Jump down left and enter door
- Small Key
- LJA past barrier
- BA both Armos
- Darknut miniboss
- Dominion Rod
- Savewarp
- Door of Time Skip
- Enter room before boss
- Armogohma
- Skip Heart Container
- Exit Temple of Time
Palace of Twilight
- Warp Mirror Chamber
- Enter Palace
- West room 1 with double hit
- West room 2 and jump attack from chest
- Phantom Zant 1
- West sol with Midna text skip
- West room 2 return
- West room 1 return
- Exit west wing
- [Clawshots / Boomerang]
- Place sol 1
- LJA to east wing
- East room 1 without hidden skills
- East room 2
- Phantom Zant 2
- East sol
- East room 2 return
- East room 1 return
- Light Sword with optimizations
- Enter north wing
- Place sols in sockets or skip staircase
- Out of bounds LJA to Zant heads
- Small key with faster platform spawn
- Out of bounds LJA to door
- Boss key area
- Don't forget the boss key
- Early Platform room
- LJA after Early Platform
- Kill the waves of shadow beasts
- Enter Zant
- Zant without Zora Armor
- Skip Heart Container
- Exit Palace of Twilight
Hyrule Castle
- Warp Castle Town
- Mailman Skip
- Barrier destruction cutscene
- Enter Hyrule Castle
- Barrier 1 with bomb
- Skip Barrier 2
- King Bulblin 4
- 1-frame backflip to savewarp
- If failed, savewarp or avoid walking into Barrier 2 on the way back
- Enter Castle
- Barrier 3 Skip
- Darknut room
- Enter puzzle room (right door)
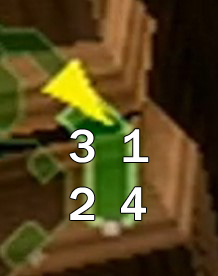
» Torch puzzle (NE, SW, NW, SE)
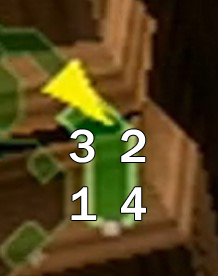
» SW, NE, NW, SE (1s slower but safer)
- Dynalfos with bomb
- Aeralfos
- Small Key
- Big Key
- Enter tower
- Block room shortcut
- Last group of lizalfos
- Skip final darknut
- Enter final battle
- Ganondorf